Getting started
How to build with one single file a TAP service.
Introduction
Creating a TAP service implies creating a Web service able to interact with a Web client (e.g. Web browser, command shell, standalone application, Web application), a database, a file system (local or remote), and a lot of threads. The TAP Library aims to deal with the whole protocol defined by the IVOA. However, because so many aspects have to be taken into account, some information must be provided to the library. What is explained in this Getting Started is how to provide the minimal configuration in order to set up a basic running and functionnal TAP service. It is obviously possible to set much more parameters and to customize some parts of the service, but this is described in more details in the other documentation pages available on this web site.
For the moment, let's focus on our simple use case and see what is this configuration file!
To start this Getting Started, you can use the following archive to deploy in your web application server. It already contains the basic directories of a web application, the library JAR file and empty files that you will fill little by little while following this Getting Started.
I. TAP configuration file What is this file? How does it work?
Using the first version of the library, the only way to create a TAP service was to implement ourself at least 3 Java classes (as explained in the alternative of this Getting Started). This new version offers a new way, much easier and faster by proposing to write only one textual file. This configuration file lets configure a lot of TAP aspects (e.g. upload, formats, UDFs, logs, ...), with for each, often several configuration possibilities.
Servlet configuration
As the other way to create a TAP service with this library, we need an HTTP servlet. When using the configuration
file, this servlet already exists and is called tap.config.ConfigurableTAPServlet. The servlet configuration is always the same whatever is your service
configuration. Here is what we should have in minimum in our WEB-INF/web.xml:
<?xml version="1.0" encoding="UTF-8"?>
<web-app xmlns:xsi="http://www.w3.org/2001/XMLSchema-instance" xmlns="http://java.sun.com/xml/ns/javaee" xsi:schemaLocation="http://java.sun.com/xml/ns/javaee http://java.sun.com/xml/ns/javaee/web-app_3_0.xsd" version="3.0">
    <servlet>
        <display-name>tap</display-name>
        <servlet-name>MyTAP</servlet-name>
        <servlet-class>tap.config.ConfigurableTAPServlet</servlet-class>
    </servlet>
    <servlet-mapping>
        <servlet-name>MyTAP</servlet-name>
        <url-pattern>/tap/*</url-pattern>
    </servlet-mapping>
</web-app>
Now, that we have declared our service in our web application, let's focus on our subject of interest: the TAP configuration file itself.
File location
This file can be accessed by the library from any location, but 3 default locations should always be preferred. Why? The following locations let keep this file close to the web application while remaining unaccessible for a web client:
- a directory of the classpath (e.g.
WEB-INF/classes), - inside
WEB-INF, - or inside
META-INF.
The TAP library is able to detect automatically this file in all these locations provided that this file is exactly named:
tap.properties.
So, in this Getting Started, we choose to name this file tap.properties and to put it inside the WEB-INF
directory. Now, let's see what this file should look like.
Syntax
It is actually a Java Properties file. Its syntax is really simple and can be illustrated by the following example:
# Every line starting with a # character is a comment.
# A configuration item is called a property and is set using a key with a value, both separated with a =, like below:
key = value
Properties
A lot of properties are supported by the library and are listed and explained in E. TAP Configuration File. Few properties are required in order to get a working TAP service. These concern the database access, the TAP metadata and the file system access. We will now see, in the following parts of this Getting Started, how to set them.
II. Database Access How the library must access our database?
1. Possible access methods
The database access is the first thing to consider configuring in our TAP service. The library offers through its configuration file 2 methods: JNDI and JDBC parameters.
Because it is the basic database connection method in Java, the library provides the JDBC method. However, for a program requiring a lot of interactions with a database (as in a TAP service), it is often recommended to use a connection pool .That is of course something also strongly recommended while using this library.
A generic way to use a connection pool in Java web applications is to use JNDI
in order to store a Java object delivering database connections. This object is called datasource
and implements the interface javax.sql.Datasource.
Its configuration is generally done in 1 or 2 configuration files of the used Web Application Server
(for instance, in Tomcat: META-INF/context.xml and WEB-INF/web.xml). The same
parameters as with JDBC are generally asked...so no particular difficulties here. Besides, it is very
often possible to add some parameters to specify limits on the number of connections to manage (e.g.
maxActive, maxIdle, maxWait).
2. Set the database access
So, now let's see concretely how to give a database access in this TAP configuration file. Below, the two methods are explained. You can choose the one you want to use, knowing that the JNDI should be always preferred for performance considerations.
Just 1 parameter to select the JDBC method and 4 additional parameters to configure it are required here, nothing else:
database_access = jdbc
jdbc_driver = org.postgresql.Driver
jdbc_url = jdbc:postgresql:MyStarCatalogues
db_username = tapuser
db_password = *****
jdbc_driver may be omitted if you don't know the name of the
JDBC driver class AND that you are using a PostgreSQL, Oracle, MySQL or SQLite database. The library
will guess it from the JDBC URL.
In this method, ONLY one additional property is expected: datasource_jndi_name. It gives the
JNDI name/key of the datasource to use. This means that the datasource must be configured in your Web
Application Server. Here is how to proceed with Apache/Tomcat:
i. Define a datasource
If no datasource is already defined, add the following lines in your META-INF/context.xml
(which may be created if needed).
<Context>
	...
	<Resource name="jdbc/myDatasource" auth="Container"
		type="javax.sql.DataSource"
		driverClassName="org.postgresql.Driver"

		url="jdbc:postgresql:MyStarCatalogues"
		username="tapuser" password="*****"

		maxActive="10" maxWait="2000" />
		...
</Context>
These lines have been adapted for our use case, but of course, you need to adapt them for your own service. You should also notice 2 more things:
- The given resource name is prefixed with
jdbc/. It is a convention while adding a datasource to JNDI. That lets group all datasources in the same directory (i.e.jdbc) in JNDI. - There are 2 attributes in addition of the standard JDBC ones:
maxActiveandmaxWait. They are used to set some limits in the Tomcat's connection pool. They limit respectively the number of open connections and the time (in milliseconds) the pool must wait for a connection coming back into the pool, when none are available any more and that one is requested.
ii. Reference the datasource to use
Now, the specified datasource will be created and added into the JNDI system, but in order to
use it in our application, we have to reference this resource. For that,
we must add the following lines in WEB-INF/web.xml:
	...
	<resource-ref>
		<res-ref-name>jdbc/myDatasource</res-ref-name>
		<res-type>javax.sql.DataSource</res-type>
		<res-auth>Container</res-auth>
	</resource-ref>
</web-app>
Except the reference name (which must be the same as the name given in META-INF/context.xml),
nothing should really change for your own TAP service.
iii. Update the TAP configuration file
Finally, you have to set the two following properties in your TAP configuration file: database_access
and datasource_jndi_name.
database_access = jndi
datasource_jndi_name = java:/comp/env/jdbc/myDatasource
The name you provide in META-INF/context.xml and WEB-INF/web.xml
is always a relative path. When you reference it in the TAP configuration file, you MUST give the full path.
When using the Tomcat's JNDI, the relative path should be prefixed with java:/comp/env/ as done above at line 2!
For both of these methods, the JDBC driver JAR file must of course be in the classpath of your web application. In other words,
it must be either placed in the lib directory of your Web Application Server (i.e. Tomcat here) or just
in WEB-INF/lib directory.
3. ADQL to SQL
About the database configuration, we have one last property to set: sql_translator. Indeed, TAP is using
by default ADQL as query language. It means that a translation from ADQL to SQL is needed before sending the query
to the database. These both languages are really closed, but some ADQL's geometrical functions need a special
implementation that totally depends from the choosen DBMS.
More and more DBMS provide extension to deal with position and coordinates. For instance, two extensions are proposed for PostgreSQL: Q3C and PgSphere. Of course, both require an installation, more or less trivial, in your Postgres system.
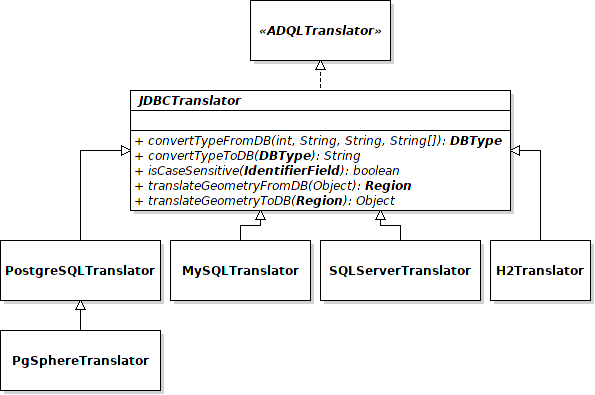
However, in the TAP configuration file, only PgSphere is currently supported for PostgreSQL. MySQL and
MS-SQLServer are also supported, but without the geometries. If you want to support another DBMS or
the geometries differently, unfortunately you have to provide your own class extending the abstract
class JDBCTranslator.
Only functions in relation with DB types and geometrical functions are abstract and need to be implemented.
sql_translator
So, to sum up, for this property, 5 values are possible: postgres, pgsphere,
mysql, sqlserver, h2 or a full class name (provided between {}).
The value postgres is actually a translator which will translate geometrical functions
as they are in ADQL ; in other words: no SQL translation. But the PostgreSQL types are at least
well supported. So this value can be used if your TAP uses PostgreSQL and if you are not interested
by geometrical functions. Obviously, it can be also used just for test as we will do in this
Getting Started, with the following TAP configuration file line:
...
sql_translator = postgres
The database access is now fully configured. But we still need to specify to the library which schemas, tables and columns must be accessible through the TAP service. As for the database access, several methods are proposed. Let's see which ones!
III. TAP Metadata Which tables and columns must be published?
metadata means here a list of schemas, tables and columns, and all information available about them (e.g. name, description, utype, ucd, unit).
In your database, you have generally a lot of tables, and for each, a lot of columns. Surely all of these tables and columns must not be exposed to the whole world, and particularly DBMS system tables. So, even if the library is able to discover with JDBC all available tables in the database and to include them in the TAP metadata, it is not a secured way to proceed. That's why the service administrator has to provide all these information...hence this configuration step.
In this part, we will then focus on the property metadata which lets configure the metadata
discovery method to use. It can have 3 different values, that we are going to describe right now.
1. Possible data discovery methods
Here are the 3 metadata discovery methods proposed when using the TAP configuration file:
- Read an XML file: The
/tablesresource of a TAP service returns a list of schemas, tables, columns and foreign keys, in an XML document. A such document can be provided in the TAP configuration file. It is expected that the list matches exactly what is available in the database ; particularly the name of schemas, tables and columns. This document must respect the XML schema defined by VODataService. The root node of this document must betableset. - Read a DB schema: Any TAP service must have a database schema named
TAP_SCHEMAand having the minimum structure explained in the TAP protocol. This schema contains a defined set of tables listing published schemas, tables and columns. By reading this schema, the TAP library is able to get all needed metadata. - Programmatic declaration: Manual solution which consists to create a
TAPMetadataobject set with all needed metadata. This method gives a maximum liberty to list metadata with the method of your choice (e.g. other configuration files, access another database, hardcoded metadata).
The recommended method is the second one: 2. Read a DB schema.
The reasons are fairly simple: no need to update the database and less work. In addition, it prevents error about
column types conversion (from TAP to DBMS types), but also errors in relation with the XML schema to use and the XML syntax or
in relation with Java class compilation. So, in one word: less sources of error. Besides, more information may be provided
and used by the library if additional columns are added in some TAP_SCHEMA tables.
A column dbname may be added to set the real database name of a schema, table or column. Indeed, the name
specified in the TAP_SCHEMA tables is the name to use in ADQL queries. By default, this name and the database
element name are identical. However, this name may be different from the real database element ; then called
DB name (in opposition to ADQL name). This difference may then be specified with the additionnal column
dbname.
Explained like that these 3 methods may seem a way complicated and abstract. But everything will now become more simple with the following concrete explanations. A template and/or an example are also provided for each of these methods.
2. Declare metadata
To use this method, we must write an XML document respecting the XML schema VODataService.
This file may be located anywhere inside your local file system. But, as for the TAP
configuration file itself, it makes more sense to put this file inside
WEB-INF - a not-public directory inside the web application directory.
So, finally, when this file is written, we just have to set two configuration properties, as illustrated below:
...
metadata = xml
metadata_file = WEB-INF/tables.xml
The property metadata_file must be a path to the XML document containing
the TAP metadata. In most cases, it will be absolute. Nevertheless, if the file is
inside the web application directory, it may be relative to it. That's why, here,
the property metadata_file is a relative path, pointing a file inside
the directory WEB-INF and named tables.xml.
TAP_SCHEMA (recommended)
In this method, every metadata must be in the database schema TAP_SCHEMA.
The content of this schema is detailed and explained in the
TAP documentation.
Once this database schema created and updated, just specify in the TAP configuration file
that all metadata the library needs are in the database schema TAP_SCHEMA:
...
metadata = db
TAPMetadataHere, things are a little more complicated, because we have to write a Java class. However, we have more flexibility: list of tables can be hardcoded or may be fetched from other files, another database or with any other method. The way we get them does not matter for the library since we are providing them.
The class we have to write must extend the class TAPMetadata.
public class MyMetadata extends TAPMetadata {
	...
}
Once this class specified in the configuration file, the library will search for a constructor having one of the two following signatures:
- (UWSFileManager fm, TAPFactory factory, TAPLog logger)
- ()
If there is a constructor for both lists of parameters, the most complete one will always be preferred. In other words, if we defined MyMetadata() and MyMetadata(UWSFileManager fm, TAPFactory factory, TAPLog logger), only the second one will be used by the library.
The choice of the constructor to write just depends of what we need in order to get our metadata or if we want to report anything (e.g. error, warning, success) in the TAP log file. In our case, the empty constructor will be enough, since we will hardcode the metadata.
Once our metadata class finished, we just have to specify it inside the TAP configuration file. Here, the rule for class specification is to surround its full class name (i.e. including its package name) between {}. So, here is how it looks like:
...
metadata = {aPackage.MyMetadata}
3. What does the library with TAP metadata?
Whatever is the choosen metadata discovery method, the library will load all these information in memory
inside a Java object of type TAPMetadata.
This object will be used in order to check ADQL queries (i.e. check that all referenced schemas, tables and
columns exist), to return metadata about all selected columns inside a query result header or to merely
build the content of the TAP resource /tables.
Besides, as reminded in TAP Reminder, you should also know that there are 2 ways to
get these metadata with a TAP service: an ADQL query on the tables of the schema TAP_SCHEMA or a
HTTP-GET request on the TAP resource /tables. The first one is just interrogating database tables
using the TAP resource /sync or /async with an ADQL query. The second way consists in
returning an XML document containing almost all information contained in the database schema TAP_SCHEMA.
Consequently, the library must ensure that information returned by these two methods are exactly the same. To
achieve this goal, it always generates the XML document returned by /tables with information of the
database schema TAP_SCHEMA, and never the contrary. Thus, depending of the method choosen in the
property metadata, the database may be updated (or created). Basically:
- with the 1st and 3rd methods, the library will drop (if already exists)
TAP_SCHEMAand then re-create it completely. - Using the 2nd method, this database schema will be updated only if the provided one is incomplete (e.g. missing standard TAPtable).
Because of the possible update of TAP_SCHEMA, the JDBC user declared in the previous step should
always have enough permissions to create and drop schemas and tables. These operations will always concern the
database schemas: TAP_SCHEMA and TAP_UPLOAD ; all the other tables and schemas will
never be altered but might be ONLY interrogated with SELECT queries.
Database access and TAP metadata are now configured. One more step, and our TAP service will already be functionnal. This last mandatory step/property is about the file system access...
IV. File System access Where TAP files must be stored?
The TAP library must manage logs and asynchronous jobs' backup, results and errors. The library proposes to store them as files whose a local root directory must be specified by the administrator. However, since they may be several ways (e.g. database, remote file system) to deal with these kinds of information, a custom manager can be provided.
Thus, the 2 following methods of file management are proposed in a TAP configuration file through the property
file_manager:
This method is the simplest. All files listed above will be stored in the local directory specified
in the property file_root_path. Thus the corresponding lines of the TAP configuration
file will be:
...
file_manager = local
file_root_path = /somewhere/TAPFiles
As for the metadata XML file, the directory specified by file_root_path may be
absolute or relative. If relative, the path will make reference to the web application
directory.
UWSFileManager
For another management of these files, we have to provide an implementation of the interface
UWSFileManager. Once
this class written, nothing else that the following line must be added into the TAP
configuration file:
...
file_manager = {aPackage.MyCustomFileManager}
As for the property metadata, the full class name of a class extension must
always be given between {} in the TAP configuration file.
By implementing UWSFileManager,
if is perfectly possible to store some or all files in a VOSpace.
This implementation may be included in the library in a next (sub-)version. However, if you
already have one, please share it with the library developer so that it can be shared with other
users of the TAP library.
First TAP service start!
Yes, already at this stage, the TAP service is already operational. So before adding few more options, let's check that!
Start your Web Application Server and deploy your application. In your favorite browser, go to the root resource of your new TAP service (which should be: http://localhost:8080/myfirsttap/tap). You should get the following page:
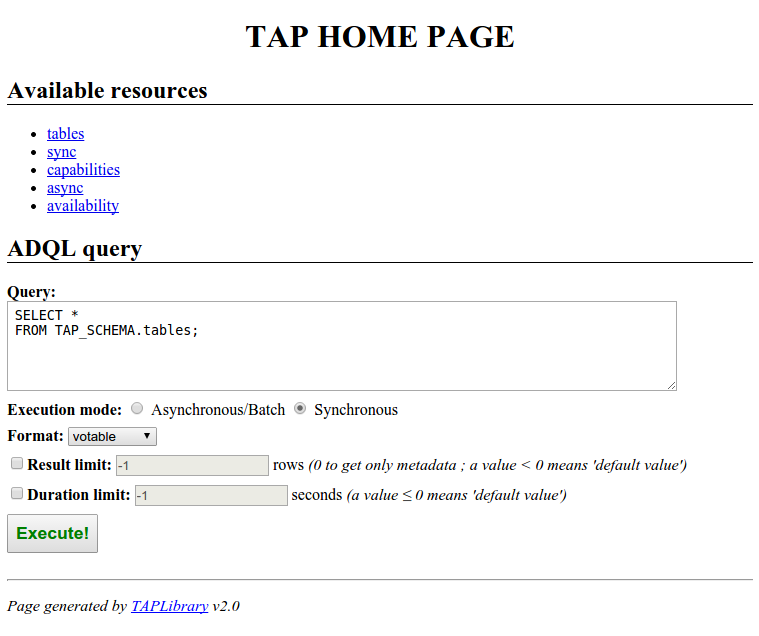
This page is the default page set by the library to the root TAP resource. Its contents is dynamically built in function of the service configuration. For instance, the list of formats and the list of TAP resources reflect exactly the setting of the TAP service. Besides, the HTML form may allow to upload a VOTable file if the UPLOAD feature is enabled. Similarly, the name and the description of the provider may appear on the top of this web page if they are set in the configuration file.
This default home page can be obviously changed with the property home_page
(see E. TAP Configuration File for more details).
If you want, you can also test all the other resources, and more particularly that /tables
contains exactly the schemas, tables, columns and all other metadata you want. It is also recommended
to test the query execution with the TAP resources /sync and /async which could be done easily
using the simple form of the default home page.
There are possible sources of error. Here are some points you should check:
- the web application is successfully deployed
- the URL of the root resource should be something like:
http://localhost:8080/{webappName}/tap({webappName}is the name with which your web application has been deployed). - the properties file is named
tap.propertiesand is either in a directory of the classpath, or inWEB-INFor inMETA-INF - the following properties have a valid value in the TAP configuration file:
database_access,sql_translator,metadataandfile_manager - the JAR file corresponding to the JDBC driver is in
WEB-INF/lib - the given JDBC username exists and have enough permissions to create and to drop a schema and a table
Besides, in addition of the error returned in your browser, you can also take a look to the TAP
service log file named service.log in the directory you set in the property file_root_path.
Of course, this log can be used only if the error is not coming from this property or from the TAP configuration
file loading.
Anyway the log file(s) of your web application server could also help you.
If you still have no idea of the origin of the error, you can contact the developer of this library.
If everything is fine: Congratulations! We can now set few more options in order to specify the list of possible output formats (by default all formats provided by the library), to configure the UPLOAD feature (disabled by default), to list geometries and UDFs and to set some limits.
V. TAP Input And Output How to customize output formats and to set the Upload feature?
A TAP service user has the ability to choose the result format, the maximum number of rows he wants to get and can also upload one or more table to cross his own data with the one of the TAP service. All these points can be configured/limited in the TAP configuration file.
Output formats
By default, the library enables all formats that it implements. That is to say: VOTable (binary), VOTable (binary2), VOTable (tabledata), VOTable (fits), FITS, CSV, TSV, JSON, HTML and Text (human readable table).
But what if we just want to provide few of them or to extend this list. In such a case, it is possible to provide a
list of formats to enable thanks to the property output_formats.
Formats provided by the library
This new version of the library uses STIL in order to format query results in as many formats as possible. Thus, VOTable (with several data serializations) and FITS are possible output formats already included in the library. Besides, the followings are natively implemented in the library: JSON, HTML, CSV, TSV and Text (human readable table).
In the configuration file, a comma-separated list of formats is expected. You can thus specify any of the formats listed above using the following values (you can also see the MIME type and its short form which will be set by default):
| Format | Property value | MIME type | Short form |
|---|---|---|---|
| VOTable (binary serialization) | votable | application/x-votable+xml | votable |
| VOTable (binary2 serialization) | votable(b2) | application/x-votable+xml;serialization=BINARY2 | votable/b2 |
| VOTable (tabledata serialization) | vot(td) | application/x-votable+xml;serialization=TABLEDATA | votable/td |
| VOTable (fits serialization) | vot(fits) | application/x-votable+xml;serialization=FITS | votable/fits |
| FITS | fits | application/fits | fits |
| CSV | csv | text/csv | csv |
| TSV | tsv | text/tab-separated-values | tsv |
| JSON | json | application/json | json |
| HTML | html | text/html | html |
| Text (human readable table) | text | text/plain | text |
Format options
Few notes about the VOTable format.
First, you may have noticed that the format name can be either votable or vot.
Then, you should know that, in the library, the default VOTable format (with the short form votable)
has a BINARY serialization. This choice has been taken in order to avoid too big
result files. Besides, the VOTable version set by default by the library is always the last released
(i.e. in this version: 1.3).
However, if this version and/or the MIME type and/or the short form of a VOTable format set by default do not fit your needs, you can redefine them by using the following syntax:
votable(serialization,version):mime_type:short_mime_type
Here, serialization must be a value among: tabledata (or td),
binary (or b), binary2 (or b2), fits.
And version must be among: 1.0 (or v1.0), 1.1
(or v1.1), 1.2 (or v1.2), 1.3 (or v1.3).
For instance: vot(td,1.2)::votable for a VOTable format using the version 1.2,
the serialization TABLEDATA and whose the MIME type will be
application/x-votable+xml;serialization=TABLEDATA and the short form
votable.
In addition of CSV and TSV, you may also add other Separated Values formats using the following syntax:
sv(separator):mime_type:short_mime_type
For instance: sv(|):text/psv:psv, for a Pipe-Separated Values format.
Custom format
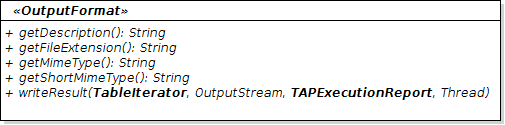
As for several properties, it is again possible to add a custom output format by extending a class of the
library. Here, it is an interface called:
OutputFormat.
Once this implementation written, you can add it in the formats list by wrapping its
full class name between {} like below:
output_formats = vot, fits, {apackage.MyCustomFormat}
Our use case...
While describing our use case, we said that we want 4 output formats: VOTable (binary), VOTable (TD), FITS and CSV. So using the above information, here is the line to add in our TAP configuration file to enable all these output formats:
...
output_formats = votable, votable(td), fits, csv
Output limits
By default all rows matching the user query will be returned. But the user can also specify how many rows
he wants at most. For performance reason, the default value and the user value may be limited.
These limits correspond respectively to the properties output_default_limit and
output_max_limit.
Both of these values must be positive integer ; a negative value meaning "no restriction".
Obviously output_default_limit must always be less or equals to
output_max_limit ; a negative value is then considered as bigger than any
positive value. By default, both of these values are equals to -1 and so
have no restriction.
In this Getting Started, we consider there is no need to put some limit here, so nothing will be added into our TAP configuration file. But you can do it if you want.
Upload configuration
By default the UPLOAD feature is disabled. However, it can be easily enabled by setting the property
upload_enabled to true. When enabled, it is possible to
set a limit the size of uploaded tables with the property: upload_max_db_limit.
This limit can be expressed in rows or in bytes, and follow the
same rules as for the output limits: only positive value ; a negative value means "no restriction"
(which is the default behavior) ; the default is 1 million rows.
Another parameter can be set about upload: upload_max_request_size. This parameter
specifies the maximum allowed size (in bytes) for an entire single HTTP request (uploaded files included).
If the request is larger than the set value, the request is rejected before being processed.
Again, a negative value means "no restriction". It is however recommended to set one ; the default
is 250MB. You should set this parameter so that it does not conflict with upload_max_db_limit.
In our use case, we wanted to enable the upload feature, but did not specify any limit so these will be leaved at their default value, as for the output limits:
...
upload_enabled = true
As said previously, the default TAP home page is dynamic and reflects the current TAP configuration. So, now that the UPLOAD feature is enabled, you should notice a difference on this home page after a restart of your Web Application Server ;-)
VI. ADQL Configuration
1. Geometrical functions
The main difference between SQL and ADQL is the addition of geometrical functions. These latter
let mainly select a part of astronomical objects (e.g. stars, galaxies) in function of their position in the sky.
The complete list of these functions is: AREA, BOX, CENTROID,
CIRCLE, CONTAINS, COORD1, COORD2, COORDSYS,
DISTANCE, INTERSECTS, POINT, POLYGON and
REGION.
Using a standard DBMS configuration (i.e. sql_translator = postgres),
none of these functions could work. Otherwise, in some cases, even if corresponding functions can be found
in the DBMS, a TAP service implementation may choose to not support all these geometrical functions.
Hence the property geometries which lets list all ADQL geometrical functions we want to
allow. The syntax of this property is merely a comma-separated list whose each item is the name
(case insensitive) of the function to allow.
The full list of all allowed geometrical functions is given in the /capabilities
of your TAP service inside the tag languageFeatures.
When all functions are allowed, this list is empty.
By default, the list is empty meaning that all geometrical functions are allowed. It is also possible to
forbid all of them with the special value NONE. But in our use case, all must be allowed. So
this property will be not set in our TAP configuration file and will remain an empty list
(i.e. all functions are allowed).
2. Coordinate systems
Some ADQL geometrical functions (e.g. POINT, CIRCLE) has a parameter to set the coordinate system to use.
Thus, it would be possible to work in the desired coordinate systems, independently from the one in which
database data are expressed. However, this implies conversions that are not trivial to implement, and even
sometimes not possible. Consequently, it is possible to configure the library so that rejecting ADQL
queries using an unexpected coordinate system. For that, we have to set the property
coordinate_systems.
In ADQL, to expressed coordinates in the coordinate system in which data are stored in the database,
you just leave the coordinate system parameter empty. For instance:
POINT('', ra, dec).
Some restrictions on the STC-S usage in TAP are sets by the IVOA:
- Frame:
ICRS,J2000,FK4,FK5,ECLIPTIC,GALACTICandUNKNOWNFRAME - RefPos:
BARYCENTER,GEOCENTER,HELIOCENTER,LSR,TOPOCENTER,RELOCATABLEandUNKNOWNREFPOS - Flavor:
CARTESIAN2,CARTESIAN3andSPHERICAL2
The TAP library implementation of STC-S is only based on these restrictions ; the full STC-S syntax is not supported.
The library does not process conversions between coordinate systems! Library users have to deal with these conversions by themselves. Generally they must be implemented and processed in the DBMS while executing the query ; that's why the library can not do anything about them, except their detection in the query.
To specify allowed coordinate systems, we have to provide a list whose each item is a kind of
regular expression. On the contrary to the ADQL expression, each part must be present. In brief,
a string of exactly 3 parts (in the order: Frame RefPos Flavor) must be provided. Each part can be either
a value, a * meaning all values, or a list of values - with the syntax
'(' value1 ('|' value2)* ')' (e.g. "(ICRS|J2000)" ; only 1 item like "(ICRS)" is also accepted).
Here is an example of a correct list: ICRS * *, ECLIPTIC * (CARTESIAN2 | SPHERICAL2).
However, in this Getting Started, we specified that only ICRS coordinates are allowed. So we add in the TAP configuration file the following line:
...
coordinate_systems = ICRS * *
3. User Defined Functions
In addition of the geometrical functions, ADQL also allows the addition of custom functions called
User Defined Functions (abbreviated UDF). It is also possible to declare such
function in the TAP configuration file with the property udfs. The value of this
property is a list of function declarations. Each item must be surrounded by square brackets:
[].
However the addition of UDF is not as straightforward as for the coordinate systems and the geometrical functions. Indeed, in the configuration file we are going to declare functions...which means that the functions must already exist in the database. Alternatively, sometimes we may want that an ADQL function is just replaced by some SQL instructions ; thus the function does not exist in the database and the UDF behaves like a macro for some SQL instructions. Moreover, a third use case could be similar to the metadata declaration: the ADQL name of the function may be different from the function name in the database. Or of course, the signature (i.e. list of parameters) may be slightly or completely different.
Consequently, in order to take into account all these use-cases, we have to distinguish 2 general cases:
- the function already exists in the database, with the same name and the same signature
- the UDF is an alias for SQL instructions, or the function exists in the database but with a different name and/or with a different signature
Case 1: The function exists
In the first case, we just have to provide the signature of the function to declare. It consists of a
simple string whose the syntax is the same as the UDFs listed in /capabilities. Here is
a small reminder of this syntax as defined by the IVOA in
TAPRegExt Recommendation 1.0 (section
2.3. Languages Supported):
signature ::= <funcname> <arglist> "->" <type_name>
funcname ::= <regular_identifier>
arglist ::= "(" <arg> { "," <arg> } ")"
arg ::= <regular_identifier> <type_name>
type_name can refer to a TAP, a VOTable or a primitive Java (+ String) types. Inside
the library, types are stored in TAP types and are converted into VOTable or Java types when needed.
Example of UDF declaration:
udfs = [foo() -> VARCHAR], [foo2(param1 int, param2 double) -> REAL]
Note that it is possible to add a description to a UDF. This description will be visible in the capabilities of the TAP service, so that users are aware about the available functions, what they do and how to use them. Here is how to provide a UDF's description:
udfs = [foo() -> VARCHAR], [foo2(param1 int, param2 double) -> REAL, , "Description of my super function."]
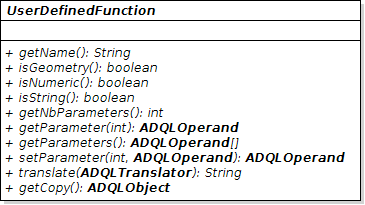
Case 2: No exact match in the DB
In this case, in addition to the signature, a class must be provided. This class must extend UserDefinedFunction. An empty constructor is expected by the library ; if there is none, an error is thrown.
Then the syntax of an item of the property udfs is a bit different: now
the class is specified inside the square brackets after the signature and separated with a
comma.
udfs = [foo() -> VARCHAR, {apackage.MyFooFunction}]
Again, a description can be added for more clarity for the TAP users:
udfs = [foo() -> VARCHAR, {apackage.MyFooFunction}, "My custom Foo function."]
On the contrary to the geometrical functions and the coordinate systems, when the property udfs is
empty, NO unknown functions is allowed. This is the default behavior.
The special value ANY lets however raise this strong interdiction by allowing any unknown functions.
In this case, these functions are translated into SQL as they are written in ADQL. So an error may occur if one of
them does not exist in the database.
In this Getting Started, we wanted to add 4 UDFs: random, rtrim, rpad and initcap. All of them already exist in PostgreSQL, with the same name and signature. So we are in the first case and we do not have to write any Java class ; the functions signature is enough. Here is then what we add inside our TAP configuration file:
...
udfs = [random() -> double], \
       [rtrim(txt String) -> String, , "Remove trailing spaces."], \
       [rpad(txt varchar, len int, fill varchar) -> VARCHAR, , "Append as many characters needed from `fill` to `txt` so that the length of the final string is `len`."], \
       [initcap(txt varchar) -> varchar, , "Put the first character in upper case and all the others in lower case."]
Finally...
We finally reach our goal in just few simple text lines! By restarting our web application server with the last modifications we should now have exactly what was specified at the beginning of this Getting Started.
Of course, more options may be set about, for instance, limit on the asynchronous jobs, logs and backup. For that, you are encouraged to take a look at E. TAP Configuration File.