

A. Getting started
3. Defining the job
Now we have our servlet and our UWS all that's missing is the job ! With this library a job is an instance of an AbstractJob sub-class. So the job our UWS must manage - named previously "JobChrono" - must be an extension of AbstractJob. In this last part of the tutorial you will see how to define a UWS job through the example of JobChrono.
AbstractJob
The IVOA Recommendation describes the main attributes of a job as well as its behaviors. All this description has been preserved in AbstractJob.
As said in the introduction, the task of a job is the only thing that really change between two UWS. It is for this reason that this library defines a job in an abstract class. The function jobWork(), which lets defining the task of a job, is the only abstract method.
Here is a simplified class diagram of AbstractJob:
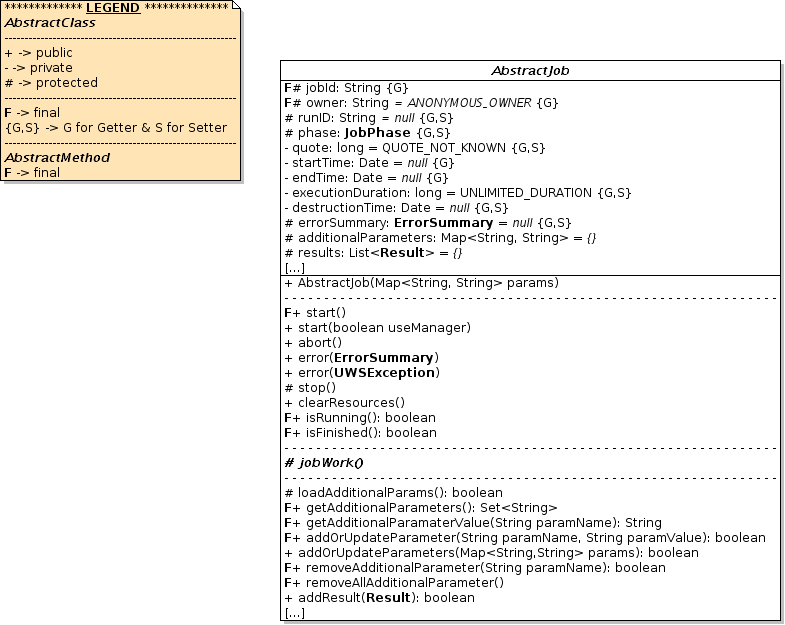
Now let's see how to extend AbstractJob !
The constructor
AbstractJob has four constructors. Three of them require a map of parameters (default and/or additional). If the job has to be used by BasicUWS, ExtendedUWS or one of their sub-class you must ensure that the constructor with only the map of parameters exists. Indeed these classes use the Java Reflection to create jobs. They expect to use the constructor with only one parameter of type Map: AbstractJob(Map<String,String>).
The last constructor is discouraged because it lets initializing manually all the fields of the new job. No processing or check is done on the attributes. Consequently it can produce errors or "paradoxes" like a job with a phase COMPLETED but with an error summary, or worse a job whose the job ID is already used by another job (in this case the job can not be added in its job list).
In the most cases, the constructor with only one parameter of type Map (AbstractJob(Map)) is clearly enough !
public JobChrono(Map<String, String> lstParam) throws UWSException {
	super(lstParam);
}
Managing job parameters
Any timer has to wait a given time. This time must be set at least at the job initialization and may be updated before the job execution. As it is not a default attribute of a UWS job, it is considered as an additional parameter and so it is stored in the attribute additionalParameters. With AbstractJob you can check or process these parameters by overriding loadAdditionalParams(). This function does nothing by default and is called by addOrUpdateParameters(Map<String,String>) when one or more job parameters (additionnal or not) has to be added or updated.
addOrUpdateParameters(Map<String,String>) always does the following actions:
- Call loadDefaultParams(Map<String,String>) which loads all job attributes described by the IVOA Recommendation. All the corresponding items are removed from the given map.
- Add/Update all remaining items to the job attribute additionalParameters
- Call loadAdditionalParams()
So if you want to manage yourself some additional job attributes, you must extend loadAdditionalParams(), extract the items that interest you and do what you want with them. That is exactly what we are going to do to initialize (or update) the "time to wait" of JobChrono:
protected int time = 0;

protected boolean loadAdditionalParams() throws UWSException {
	// JobChrono needs only one parameter for its execution: the time:
	if (additionalParameters.containsKey("time")){
		try{
			time = Integer.parseInt(additionalParameters.get("time"));
			if (time < 0)
				time = 0;
			// If you want you can remove this parameter from the map additionalParameters:
			// additionalParameters.remove("time");
		}catch(NumberFormatException nfe){
			throw new UWSException(UWSException.BAD_REQUEST, "The given TIME value (\""+additionalParameters.get("time")+"\") is incorrect: it must be a positive integer value !");
		}
	}

	return true;
}
Notes:
- Rather than creating a class attribute for the "time to wait" and extracting its value from the map additionalParameters, you can merely leave the corresponding item in the map and get its value when needed.
- In loadAdditionalParams() you have a full access to the map additionalParameters, and so you are able to remove an item if it is not correct or if you have already used its value. Besides you can also add or update some items if needed.
Writing the task
Writing the task means overriding the abstract method jobWork(). This method will be then called in a separated thread during the job execution. The whole thread execution and the phase transitions are already managed by this library. However you should beware to the following points when defining a job task:
- You should not have to change the job phase !
-
You should check as often as possible whether the thread has been interrupted (which would mean the user has aborted the job).
In this case you must throw an InterruptedException
so that the job execution can be stopped with the status ABORTED:
if (thread.isInterrupted())
	throw new InterruptedException();
- Any error (exception or not) must be thrown in an UWSException, so that the job execution can be stopped with the status ERROR. The error message is fetched directly from the exception.
- Writing the results is your responsibility ! It MUST be done in this method.
Now let's see what looks like the implementation of this method for JobChrono ! I remind you that the task of JobChrono is to wait a given time before writing a file with the following content: X seconds are elapsed.
protected synchronized void jobWork() throws UWSException, InterruptedException {
	int count = 0;

	// 1. EXECUTION TASK = to wait {time} seconds:
	while(!thread.isInterrupted() && count < time){
		Thread.sleep(1000);
		count++;
	}

	// If the task has been canceled/interrupted, throw the corresponding exception:
	if (thread.isInterrupted())
		throw new InterruptedException();

	// 2. WRITE THE RESULT FILE:
	String fileName = "JobChrono_n"+getJobId()+"_result.txt";
	File f = new File(resultsDir, fileName);

	try {
		// Build the directory if not existing:
		if (!f.getParentFile().exists())
			f.getParentFile().mkdirs();

		// Write the result:
		BufferedWriter writer = new BufferedWriter(new FileWriter(f));
		writer.write(time+" seconds elapsed");
		writer.close();

		// Add it to the results list of this job:
		addResult(new Result("Report", "Info", "/uwstuto/jobResults/"+fileName));

	} catch (IOException e) {
		// If there is an error, encapsulate it in an UWSException so that an error summary can be published:
		throw new UWSException(UWSException.INTERNAL_SERVER_ERROR, e, "Impossible to write the result file at \""+f.getAbsolutePath()+"\" !", ErrorType.TRANSIENT);
	}
}
As you can see this method is divided in two parts. In the first part we wait as many seconds as needed until the given time is elapsed. In the second part the result file is written. Once done it is set to the job (line 29) thanks to the method addResult.
Furthermore you can notice at lines 5 and 11 that the interrupted flag is checked. If it is true the job is aborted at line 12 by throwing an InterruptedException. Besides if an error occurs while writing the result file a UWSException is thrown at line 33. By doing that the job is immediately stopped with the execution phase ERROR.
As you have surely noticed the result file is written in resultsDir while the address given at the creation of the Result object is "/uwstuto/jobResults". Actually the Result address (absolute or relative) is the one to use to access the result. It must be a public address (i.e. http://...). In the other hand the address used to write the file is a file path (file://...), whose the direct access is forbidden out of the server.
However both addresses point exactly on the same file ! Like here, in the most cases, you will have to make a such difference between the address used to write the file and the one used to read it. What you must remember is that the Result address must always be used at least to read the result file !
resultsDir is the path of the directory which has to contain all job results files. It is a static attribute of JobChrono which is set at the initialization of the servlet UWSTimers.
Clearing resources
When the job is removed from its jobs list, the UWS stops it and frees all its resources by calling its method clearResources(). In our example we create a file at the end of the execution. This file must be deleted when the job is destroyed otherwise we risk to have some space problems...
protected void clearResources() {
	// 1. STOP THE JOB (if running):
	super.clearResources();

	// 2. DELETE THE RESULT FILE (if any):
	try {
		File f = new File(resultsDir+"JobChrono_n"+getJobId()+"_result.txt");
		if (f.exists() && f.canWrite())
			f.delete();
	} catch (Exception e) {System.err.println("### UWS ERROR: "+e.getMessage()+" ###"); e.printStackTrace();}
}