C. How to customize a Job ?
5. Destruction
How does it work ?
Destroying a job means that nothing in relation with the job must live or stay any more. In other words the job is aborted if running, all results files are destroyed and the job is removed from its jobs list. All these actions are done by the method clearResources(). By default, it is called by the jobs list when JobList.destroyJob(String) is called or when the whole jobs list is destroyed.
Automatic destruction
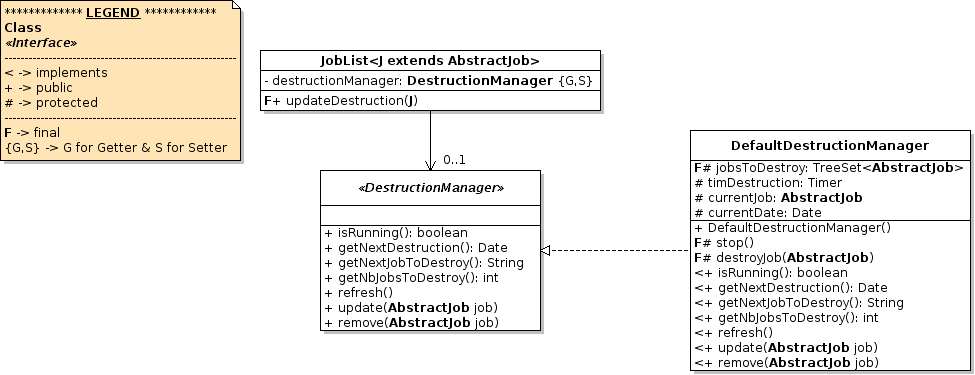
A job has by default an attribute destruction which corresponds to the date/time at which the job must be destroyed. That means that when the date/time is reached the job must be destroyed by its jobs lists. In this library the responsibility to destroy automatically jobs is given to an object which implements the interface DestructionManager. By default, a jobs list has one attribute of this type.
When a job list is added to a UWS its destruction manager is replaced by the one of the UWS. Consequently all jobs list of a UWS have the same destruction manager.
Below is a simplified class diagram of this interface:

DefaultDestructionManager is a default implementation of the interface DestructionManager. It contains a list of all known jobs whose the destruction date is set. This list is sorted by ascending destruction time. This implementation has also a timer which has to destroy the first job of the list (so the job with the earliest destruction date/time).
When a job is added into a jobs list, the destruction manager is updated by calling DestructionManager.update(AbstractJob). Then, since the job knows its jobs list, it will notify it at each modification of its destruction field, by calling JobList.updateDestruction(AbstractJob).
How to customize ?
-
To add the destruction of results files or to do any other action which must executed while destroying the job, you must override
the clearResources() method.
This has been done for the first UWS example Timers whose the source code is displayed below:
public class JobChrono extends AbstractJob { ... @Override public void clearResources() { // 1. STOP THE JOB (if running): super.clearResources(); // 2. DELETE THE RESULT FILE (if any): try { File f = new File(resultsDir+"JobChrono_n"+getJobId()+"_result.txt"); if (f.exists() && f.canWrite()) f.delete(); } catch (Exception e) { System.err.println("### UWS ERROR: "+e.getMessage()+" ###"); e.printStackTrace(); } } ... } -
As for the job execution, the job automatic destruction can be modified by implementing the DestructionManager
or by extending its default implementation (DefaultDestructionManager).
Then you just have to set it to your UWS (setDestructionManager(DestructionManager))
or to a jobs list (setDestructionManager(DestructionManager).
When changing the destruction manager on a UWS, it is also set to all its managed jobs lists !

